Dog pencil drawing of Louis the Cockapoo in colored pencils
The handsome pooch in this featured dog pencil drawing is Louis, a cockapoo. His owner, Eliza, commissioned me to draw his portrait after seeing my artwork on social media. She wrote to me...
"I’ve been looking to get a portrait of Louis for a while and I have to say I’ve not come across anyone with your level of detail. It blew me away."
I felt Louis was a pawfect subject for a portrait, so I asked her to send me a selection of photos, which we then went through together to see which one would work best as a reference.
Choosing the photo reference together
I prefer to choose a few of the most suitable images, with the best light, details, fur texture and so on. I then talk through my choices with the client, offering feedback on why I picked them and why I rejected the other pictures.
What would make me reject a photo?
- the photo is out of focus
- the pet is too far away from the camera
- I can't see any detail in the eyes
- the photographer was looking down at the animal from above
- other objects obscure sections of the animal
 We can only see one ear in this photograph
 Not close enough
 Mixed indoor and outdoor lighting
 One photograph stood out for me
Composing the dog pencil drawing
Once we have selected the best reference photo to work from, I begin by providing a mockup of the section I feel would work best. If a client requires any changes to the overall composition, they are easiest to do at this stage than once the drawing is underway.
As the chosen photo shows Louis laying on the floor, we included that in the picture to help make sense of the pose. However, I didn't take it to the edges of the paper, instead opting to fade it out gradually.
Because Louis was lying down, I wanted to create a portrait where he appeared to be comfortable rather than as if he were posing for me. When drawing animals from photos, I try to be as accurate as possible. However, I also need to be flexible in order to accommodate the way the animal is positioned.

Eliza asked if we could include the ball in the portrait, as Louis loves his toys. Including a prop such as this can add life and interest to the portrait without it becoming too busy. It also gives an indication of the dog's personality.
With Eliza's confirmation that I have captured the likeness of her pet, as well as his character and vitality, I can start drawing, gradually refining the details and adding the fur and wood textures as the scene develops.
I only use archival materials

I always use archival materials to ensure my drawings will last as long as possible. Before I start the outline drawing, I need to pick the best surface to work on. Each dog pencil drawing requires careful thought around the paper I will use.
When I work with graphite, I like to use a smooth surface such as Bristol board. However, Eliza commissioned a coloured pencil portrait.
A compromise has to be made regarding the amount of pencil pigment the paper will hold and the texture of the surface. The smoother papers allow sharp details but won't take as many layers of colour. I settled on a medium texture white paper called Stonehenge.
Next, my pencil tins were the focus of my attention. I picked out potential colours from the different brands that I normally use. Each brand has different colours and qualities. Some are soft and buttery, while others are firm and keep a good, sharp point. I selected around 26 pencils as a starting point, knowing I would add more as the drawing progressed.
Other equipment I have at hand
I rarely use a pencil straight out of the tin, but layer up colours as I need to get just the hues I require. Sometimes many, many layers are necessary to give the depth of colour and fill the paper tooth. Therefore, coloured pencil portraits can take a long time to complete. This is especially true of a dog pencil drawing of a long or curly-coated breed such as the cockapoo.
Many people ask if I use an eraser? I do, but not necessarily for correcting mistakes.
Coloured pencils can be stubborn and refuse to disappear once I have applied the pigment to the paper. However, dabbing at an area can lighten it for artistic effect. The grey amorphous shape on the left of the photo is my kneaded eraser, which I use in this manner. For lifting out whiskers or small spots, I also use a Tombow mono eraser, seen to the right of my pencils in the photo above.
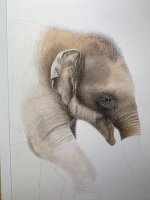
Starting the dog pencil drawing
 I start by drawing the eyes and nose
I find it helpful to start with a simple line drawing of the dog's general shape and proportions. This allows me to draw accurately and not worry about painting the fur. The next step involves sketching some details, such as the shape of the face and paws, as well as the colour pattern. I usually rough this part in lightly with a graphite pencil and then move on to the finer details using coloured pencils.
Once the basic sketch is in place I begin with the dog's eyes. I like to capture the expression as early as possible. If that doesn't happen, I know I won't be happy with the finished drawing.
The pupils are normally the darkest elements in a dog portrait and tell me how dark I can go in other areas. If the dog has a dark nose like Louis, that comes next in the drawing process.
As I am right-handed, I then move over to the left and work the rest of the piece from left to right to avoid smudging the picture.
Sharing the progress with the owner
 Working on the curls in the left ear
I always ask whether the person who has commissioned a portrait would like to see my progress during the drawing process. If so, I email them photos regularly. Because of the layering process involved with coloured pencils, it is important to manage the client's expectations and explain that no area of the piece is complete until we are both happy.
There is a bonus to taking in-progress shots. They act as evidence that the finished work is a work of art and not a photograph, when I share it on social media.
One issue that arises when photographing the early stages is that the light pencil layers don't show up very well. Adjusting the digital file can cause the paper to turn grey or darker than it actually is. I explain this to the client so they don't get a surprise later on when the photos depict the paper colour more accurately.
When we reach the end stages of production, I create a high-resolution scan of the artwork for the client to approve. When they eventually see the actual drawing itself, it often surprises them at the amount of detail that I have included. For instance, if the photograph shows hairy ears, I make sure that there is a good representation of those hairs in the drawing.
Handling the fur textures
Coloured pencils layer beautifully, which is why I enjoy drawing animals and their varying fur textures with this medium. Each different coloured layer allows me to add more depth and dimension to the overall drawing.
Louis has different fur types throughout, with soft, fluffy curls on his forehead, longer locks in his ears and short straight hairs around his nose. In this portrait, we blurred out his leg and body so I deliberately kept the texture to a minimum in those areas, while concentrating on his face and ears.
 Adding more curls to the face and forehead
Creating a realistic drawing doesn't mean drawing every single fur strand. In fact, that can backfire and end up looking like the dog has worms or spaghetti on its head!
I find the trick is to position the most obvious curls or locks correctly, and then join up those areas with random pencil strokes. I ensure the strokes lay in the same direction as the fur growth. These characteristic curls will ensure that the owner can recognize their own pet.
I always avoid putting an outline around clumps of hair as that can give a colouring book appearance, and destroy the illusion of realism.
Each curl often contains multiple hues. These are built up slowly, layer by layer, using subtle shading and blending to create some lovely results.
The completed dog pencil drawing

Feedback from the client
I enjoyed receiving positive feedback from Eliza, and also from her twelve-year-old son, Ollie, who said... "it looks too real to be a drawing! It is absolutely amazing!" It also astonished him to learn that I had used 75 different coloured pencils by the time I finished his dog pencil drawing.
If you would like me to create a portrait of your pet, either in coloured pencil or graphite, for you why not use the contact form to get in touch with me and we can discuss your requirements.
You might like these
Check my custom dog portraits gallery before commissioning a drawing
A gallery showing some of the custom dog portraits that I have been commissioned to draw in coloured pencil and graphite, and how to book yours
Graphite Dog portrait - Jack Russell Terrier
The story of a dog portrait in pencil - Mitsy the Jack Russell Terrier


Would you like to keep in touch? Sign up for my occasional newsletter below.
Recent Articles
-
Magical Pencil Portrait Drawing Process That Will Blow Your Mind
 The pencil portrait drawing process step by step - see how a drawing takes shape with step by step photographs
 -
Chicken Portraits Immortalized in Colored Pencil Just For You
 Commission a unique colored pencil chicken portrait to capture the beauty of your feathered friend. Personalized art at its finest!
 -
How to photograph pets for a colored pencil drawing reference
 How to photograph pets to give to a pet portrait artist as reference material for your commission
Copyright © 2020-2024
Carol Leather
All Rights Reserved.